Install OpenStack on Amazon Cloud (AWS)

wintermute.ai UG is a cloud company. That means we not only create cloud products like our wintermute.ai server - a secure cloud gateway - but use cloud resources ourselves wherever possible. It helps us to reduce costs, save time and pay only for the resources actually consumed. We’re a distributed company and the cloud enables our staff to work from anywhere a fast internet connection is available.
During the implementation of OpenStack support in the wintermute.ai server the developers were dependent on using a working OpenStack installation for API access and testing. Instead of setting up and maintaining an OpenStack environment in-house wintermute.ai decided to create a DevStack-based OpenStack, all-in-one installation on an Amazon Web Services (AWS) instance. Essentially this meant installing an IaaS cloud computing platform inside another IaaS cloud.
A UDS script was created which allows a developer or a group of developers to start up a full working OpenStack all-in-one installation in about 20 minutes, which includes applying all security patches to the Ubuntu 14.04 LTS system which is used as a base OS for our setup.
With this article I would like to share this setup and hope that it will help others who need a quick setup of an OpenStack testing and development environment. Please note that this will be a limited OpenStack environment as all the components will run on one virtual AWS instance and QEMU will be used as the OpenStack virtualization platform, so it will be slow. The setup is enough for testing, development or educational purpose but it’s in no way usable for any production work.
The first chapter will describe the setup for wintermute.ai server users. As the UDS scripting is shell-based, a manual setup (without wintermute.ai server) can also be done with some extra steps. The second chapter will provide instructions on performing a manual installation.
wintermute.ai server -based setup
Prepare Security Group
A simple DevStack-based setup on AWS would create a single all-in-one OpenStack installation on an AWS instance which is accessible from the OpenStack web-based dashboard (Horizon) which runs on the same instance or via the command line openstack tools from within the AWS instance. For this setup the TCP ports 22 (ssh) and 80 (http) must be opened in the AWS security groups for inbound access. Port 22 should already be open by default when using the wintermute.ai server and for port 80 a new security group should be created (e.g. OpenStackPorts).
A slightly more advanced setup would also allow connection to the OpenStack API from outside the AWS instance with 3rd-party tools like the wintermute.ai server. To do this please add the following additional TCP ports to the OpenStackPorts security group: 5000, 6000-6002, 8000-8004, 8386, 8773-8777, 9696 and 9292.
Import Ubuntu 14.04 (LTS) Image
DevStack officially supports the Ubuntu 14.04 operating system, so please import the official Ubuntu 14.04 AWS (amd64; hvm:ebs-ssd) image from your default AWS location.
Create devstack_install.sh UDS script
Create a new UDS script with the following parameters:
- Name - install_devstack.sh
- Description - DevStack Install Script - Ubuntu 14.04
- Type - bash
- Platform - Linux generic
- Stage - post-data-transfer
- Access - public
- Parameters -
- Content - use copy & paste of the following UDS script
#!/bin/bash
#
# Script for DevStack installation on a Ubuntu LTS (14.04) system.
#
#   2016, alex(at)wintermute.ai
#

OPTDIR="/opt/stack"
STACKUSER="stack"
STACKHOME="/home/${STACKUSER}"
STACKDIR="${STACKHOME}/devstack"
SWPACKAGES="git augeas-tools openssl"
PATH=/usr/local/sbin:/usr/local/bin:/usr/sbin:/usr/bin:/sbin:/bin
EXTACCESS=""

while getopts e FLAG; do
    case $FLAG in
        e)  EXTACCESS=1 ;;
    esac
done
shift $((OPTIND-1))

mkdir -p ${OPTDIR}
apt-get -y remove apparmor
apt-get -y install ${SWPACKAGES}
useradd -d ${STACKHOME} -s /bin/bash -m ${STACKUSER}

augtool -s <<EOC
set /files/etc/sudoers/spec[user = "${STACKUSER}"]/user "${STACKUSER}"
set /files/etc/sudoers/spec[user = "${STACKUSER}"]/host_group/host "ALL"
set /files/etc/sudoers/spec[user = "${STACKUSER}"]/host_group/command  "ALL"
set /files/etc/sudoers/spec[user = "${STACKUSER}"]/host_group/command/runas_user "ALL"
set /files/etc/sudoers/spec[user = "${STACKUSER}"]/host_group/command/runas_group "ALL"
set /files/etc/sudoers/spec[user = "${STACKUSER}"]/host_group/command/tag  "NOPASSWD"
EOC

git clone https://git.openstack.org/openstack-dev/devstack ${STACKDIR}

password=`openssl rand -hex 8`
echo '[[local|localrc]]' > ${STACKDIR}/local.conf
echo ADMIN_PASSWORD=${password} >> ${STACKDIR}/local.conf
echo DATABASE_PASSWORD=${password} >> ${STACKDIR}/local.conf
echo RABBIT_PASSWORD=${password} >> ${STACKDIR}/local.conf
echo SERVICE_PASSWORD=${password} >> ${STACKDIR}/local.conf
chown -R ${STACKUSER}:${STACKUSER} ${STACKHOME} ${OPTDIR}

su -l ${STACKUSER} ${STACKDIR}/stack.sh > /var/log/devstack_install.log 2>&1

if [ -f "/etc/profile.d/wmaic.sh" ];then
    source /etc/profile.d/wmaic.sh
fi

if [ -n "${WMAIC_PUBLIC_IP4}" -a -n "${EXTACCESS}" ];then
    export OS_TENANT_NAME=admin
    export OS_USERNAME=admin
    export IDENTITY_API_VERSION=3
    export ADMIN_PASSWORD=${password}
    source ${STACKDIR}/openrc
    while read -r endpoint;do
        IFS=' ' read -r -a eprecord <<< "$endpoint"
        if [ "${eprecord[5]}" == "public" ];then
            externalURL=`echo "${eprecord[6]}" | sed -r 's/(\b[0-9]{1,3}\.){3}[0-9]{1,3}\b'/${WMAIC_PUBLIC_IP4}/`
            openstack endpoint set --url ${externalURL} ${eprecord[0]}
        fi
    done < <(openstack endpoint list -f value)
fi

if [ -n "${WMAIC_PUBLIC_HOSTNAME}" ];then
    echo "Public Horizon URL: http://${WMAIC_PUBLIC_HOSTNAME}/dashboard" >> /var/log/devstack_install.log
fi

tail -20 /var/log/devstack_install.log
echo;echo "*** devstack install finished, please check log file: /var/log/devstack_install.log";echo
Start DevStack Instance
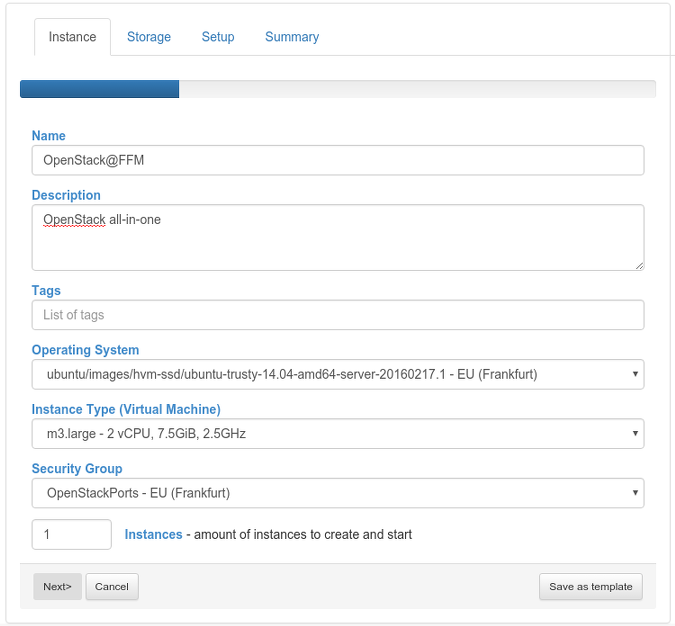
Start a new AWS instance with following parameters:
Instance
- Name - choose one
- Description - choose one
- Tags -
- Operating System - select the imported Ubuntu 14.04 image
- Instance Type - m3.large
- Security Goup - OpenStackPorts
Storage
No extra storage is required for this test setup.
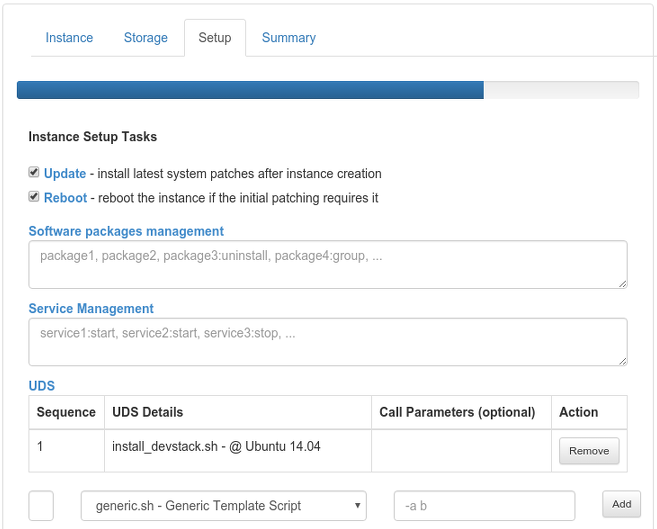
Setup
- Update - enable
- Reboot - enable
- UDS - add a new created install_devstack.sh UDS with sequence 1. If an advanced setup with remote API access was chosen and the OpenStackPorts security group contains all the required inbound ports, the optional call parameter -e should be defined.
Test OpenStack Installation
Horizon Dashboard
After about 20 minutes the installation should be complete and the AWS instance will be ready to use. The log of the instance setup task should contain a randomly generated login password for the admin and demo users:
...
This is your host IP address: 172.31.15.199
This is your host IPv6 address: ::1
Horizon is now available at http://172.31.15.199/dashboard
Keystone is serving at http://172.31.15.199:5000/
The default users are: admin and demo
The password: 9492c59277ba44fb
2016-02-23 15:56:01.842 | stack.sh completed in 1235 seconds.
Public Horizon URL: http://ec2-52-58-41-68.eu-central-1.compute.amazonaws.com/dashboard

*** devstack install finished, please check log file: /var/log/devstack_install.log
...
Open the public hostname of the AWS instance in your web browser and log in to the OpenStack Horizon dashboard using the demo user name and randomly generated password from the setup log:
OpenStack CLI Access
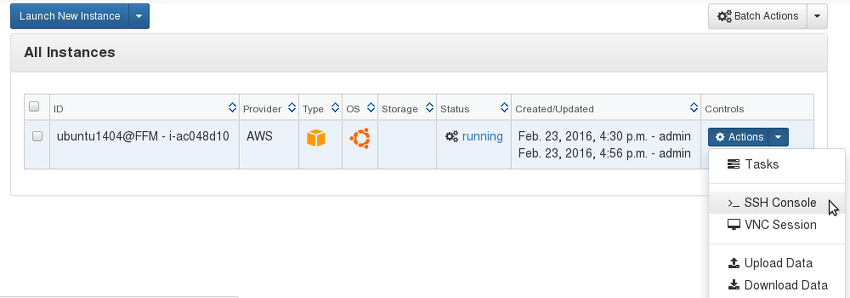
open an SSH connection from the wintermute.ai server Instances -> Actions -> SSH Console menu:
switch to the stack user, source the ~/devstack/openrc file and execute an openstack CLI test command:
[ubuntu@ip-172-31-15-199:~]$ sudo su - stack
[stack@ip-172-31-15-199:~]$ source ~/devstack/openrc
[stack@ip-172-31-15-199:~]$ openstack image list
+--------------------------------------+---------------------------------+--------+
| ID                                   | Name                            | Status |
+--------------------------------------+---------------------------------+--------+
| 011488fe-53e0-4154-b9de-160753268a5f | cirros-0.3.4-x86_64-uec         | active |
| a7ebccb8-6297-4902-b9f1-ea16f43662fa | cirros-0.3.4-x86_64-uec-ramdisk | active |
| 9103285c-dfe2-4e81-b819-18212231a29b | cirros-0.3.4-x86_64-uec-kernel  | active |
+--------------------------------------+---------------------------------+--------+
manual setup
If you aren’t a wintermute.ai server user, you can execute the following manual steps to set up a DevStack-based OpenStack, all-in-one environment on AWS:
- create the OpenStackPorts as described above (at least with open ports 22 and 80)
- select the most suitable Ubuntu 14.04 image as described above
- boot the Ubuntu 14.04 image on a m3.large instance type
- log in via SSH to the newly created instance and switch to super user (root)
- if external API access for 3rd-party tools is required, define and export the WMAIC_PUBLIC_IP4 shell variable to the public IPv4 address of the AWS instance
- download the install_devstack.sh script in to the instance
- start the script execution. If external API access is required, please add the -e as the call parameter for the script
[ubuntu@ip-172-31-26-10:~]$ lsb_release -a
No LSB modules are available.
Distributor ID: Ubuntu
Description:    Ubuntu 14.04.4 LTS
Release:        14.04
Codename:       trusty
[ubuntu@ip-172-31-26-10:~]$ sudo su -
[root@ip-172-31-26-10:~]$ wget -nv -O /tmp/install_devstack.sh http://wintermute.ai/blog/assets/install_devstack.sh
2016-02-24 09:44:02 URL:http://wintermute.ai/blog/assets/install_devstack.sh [2589/2589] -> "/tmp/install_devstack.sh" [1]
[root@ip-172-31-26-10:~]$ md5sum /tmp/install_devstack.sh
414a9e69ea49859b38c735790fe7d179  install_devstack.sh
[root@ip-172-31-26-10:~]$ /bin/bash /tmp/install_devstack.sh
...
This is your host IP address: 172.31.26.10
This is your host IPv6 address: ::1
Horizon is now available at http://172.31.26.10/dashboard
Keystone is serving at http://172.31.26.10:5000/
The default users are: admin and demo
The password: 33ed6884085cdb02
2016-02-24 10:03:57.696 | stack.sh completed in 1138 seconds.

*** devstack install finished, please check log file: /var/log/devstack_install.log
After the script is finished, continue with the Test OpenStack Installation as described above.